

Hello, and welcome to Another Salesforce Blog! Here I will be posting solutions to problems that I couldn’t find an answer to in hopes of helping those who find themselves stuck when using the Salesforce platform.
User Story
We are selling cookies door to door, and we want to keep track of the houses we’ve hit! We are going to capture the geolocation of each house on a lead object using our phones so that we know who in the neighborhood we talked to.
Background
Geolocation Custom Fields are available on Salesforce objects. We can access them using a little bit of HTML magic in a lightning component. The Geolocation field is actually made of of three fields, the Latitude, Longitude, and an internal field, so we will have to update the latitude and longitude individually.
Solution
Step one – Create a new field on the Lead object.
Before we can update a field, we need to create it! We’ll call our field “House Location.” Go to Setup > Object Manager > Lead > Fields & Relationships > New. Specify that this will be a “Geolocation” field, hit next, and enter your field labels:

Hit next, make it visible for all profiles, hit next, add to all page layouts, and hit save.
Step two – Write an Apex Controller to update the geolocation on the Lead object.
This one will be pretty easy. All we need to do is create an Apex class and a function that updates the Latitude and Longitude fields, which have the API names of House_Location__Latitude__s and House_Location__Longitude__s, on our new House_Location__c field for a specified ID. We want to make sure that our function is @AuraEnabled so that we can call it from a Lightning Component.
public with sharing class GeolocationController {

    //Function to update lead with geolocation
    @AuraEnabled public static void updateGeolocation(Id leadId, Decimal lat, Decimal lng) {
        Lead leadToUpdate = [SELECT Id FROM Lead WHERE Id = :LeadId];
        LeadToUpdate.House_Location__Latitude__s = lat;
        LeadToUpdate.House_Location__Longitude__s = lng;
        update LeadToUpdate;
    }
}
Step three – Create a Lightning Component to capture the geolocation.
In Developer Console, select File > New > Lightning Component, and enter a name and description for your new Lightning Component:

First, we must be sure to implement force:hasRecordId so that we can access the ID of the current record:
<aura:component implements="force:lightningQuickAction,force:hasRecordId" controller="GeolocationController" >
    ...
Next, we define our attributes, latitude, longitude, and recordId:
    ...
    <!--define attributes-->
    <aura:attribute name="latitude" type="Decimal" />
    <aura:attribute name="longitude" type="Decimal" />
    <aura:attribute name="recordId" type="String" />
    ...
After our attributes are defined, we will call doInit, which we will come back to in a second:
    ...
    <!--call doInit-->
    <aura:handler name="init" value="{!this}" action="{!c.doInit}" />
    ...
Let’s display our latitude and longitude in the center of the modal popup, just so we know what we’re doing:
    ...
    <!--display device latitude and longitude-->
    <div class="slds-align_absolute-center" style="height:5rem">
        Latitude: {!v.latitude} <br/>
        Longitude: {!v.longitude}<br/>
        <p/>
    </div>
    ...
And, lastly, let’s put a button that captures our geolocation by calling our Lightning Controller method, which we will write soon:
    ...
    <div class="slds-align_absolute-center" style="height:5rem">
        <!--button to call captureGeolocation in controller-->
        <lightning:button variant="brand" label="Capture Geolocation" onclick="{!c.captureGeolocation}" />
    </div>
</aura:component>
Altogether, our code will be as follows:
<aura:component implements="force:lightningQuickAction,force:hasRecordId" controller="GeolocationController" >

    <!--define attributes-->
    <aura:attribute name="latitude" type="Decimal" />
    <aura:attribute name="longitude" type="Decimal" />
    <aura:attribute name="recordId" type="String" />

    <!--call doInit-->
    <aura:handler name="init" value="{!this}" action="{!c.doInit}" />

    <!--display device latitude and longitude-->
    <div class="slds-align_absolute-center" style="height:5rem">
        Latitude: {!v.latitude} <br/>
        Longitude: {!v.longitude}<br/>
        <p/>
    </div>
    <div class="slds-align_absolute-center" style="height:5rem">
        <!--button to call captureGeolocation in controller-->
        <lightning:button variant="brand" label="Capture Geolocation" onclick="{!c.captureGeolocation}" />
    </div>
</aura:component>
Step four – Write our Lightning Controller functions.
Next, we will write our Lightning Controller. Best practices dictate that we pass our logic to a helper, so we will call a helper function helper.findGeolocation in our doInit function, and the helper function helper.captureHelper from our captureGeolocation function. We can also add a console.log() event to each so we can see if our functions are being called properly.
({
    doInit : function(component, event, helper) {
        helper.findGeolocation(component, event, helper);
        console.log('doInit called');
    },

    captureGeolocation : function(component, event, helper) {
        helper.captureHelper(component, event);
        console.log('captureGeolocation called');
    }
})
Step five – Write our Helper functions.
The last bit of code we will write will be our Lightning Helper functions. This is where it gets a little bit tricky.
Altogether, our code will look like:
({
	findGeolocation : function(component, event) {
		//finds the geolocation of the user's device
		//prompts user to allow location access if not already allowed
        if (navigator.geolocation) {
            navigator.geolocation.getCurrentPosition(success);
            function success(position) {
                var lat = position.coords.latitude;
                component.set("v.latitude", lat);
                var lng = position.coords.longitude;
                component.set("v.longitude", lng);
                console.log(lat, lng)
            }
        } else {
            error('Geolocation is not supported');
        }
	},

    captureHelper : function(component, event) {
        //obtain recordId
        var leadId = component.get("v.recordId");
        //pointer to Apex method in GeolocationController
        var action = component.get("c.updateGeolocation");
        //set parameters for Apex method updateGeolocation
        action.setParams({
            "leadId" : leadId,
            "lat" : component.get("v.latitude"),
            "lng" : component.get("v.longitude")
        });
        //set callback method
        action.setCallback(this, function(response) {
            var state = response.getState(); //fetch the response state
            if (state === "SUCCESS") {
				alert("Geolocation saved.")
            }
            else {
                alert("Geolocation not saved.");
            }
        });
        //invoke the Apex method
        $A.enqueueAction(action);
        //close quickaction window
        $A.get("e.force:closeQuickAction").fire();
        //reload page to display updated geolocation
        window.location.reload();
    }
})
Let’s break it down.
First, we have our findGeolocation function. We can pull this from an HTML Geolocation tutorial and modify it for our purposes.
({
	findGeolocation : function(component, event) {
		//finds the geolocation of the user's device
		//prompts user to allow location access if not already allowed
        if (navigator.geolocation) {
            navigator.geolocation.getCurrentPosition(success);
            function success(position) {
                var lat = position.coords.latitude;
                component.set("v.latitude", lat);
                var lng = position.coords.longitude;
                component.set("v.longitude", lng);
                console.log(lat, lng)
            }
        } else {
            error('Geolocation is not supported');
        }
	},
        ...
The contents of this function determine whether or not the device’s browser supports geolocation (or if the user allows geolocation information to be collected), and assigns the position.coords.latitude and longitude to the variables lat and lng. We then use value providers (which are discussed at length in the Aura Components Basics Trailhead) "v.latitude" and "v.longitude" to pass the values to our aura component.
Our captureGeolocation function is a little bit more complicated.
First, we must “get” our recordId, which we provided for way back when we implemented force:hasRecordId in our lightning component.
    ...
    captureGeolocation : function(component, event) {
        //obtain recordId
        var leadId = component.get("v.recordId");
    ...
Then we must call a server-side action by creating a pointer to our Apex method in our GeolocationController by using component.get("c.updateGeolocation"). We set our parameters using action.setParams({...}), and then set a callback method using action.setCallback(...). Lastly, we invoke the Apex method using $A.enqueueAction(action).
        ...
        //pointer to Apex method in GeolocationController
        var action = component.get("c.updateGeolocation");
        //set parameters for Apex method updateGeolocation
        action.setParams({
            "leadId" : leadId,
            "lat" : component.get("v.latitude"),
            "lng" : component.get("v.longitude")
        });
        //set callback method
        action.setCallback(this, function(response) {
            var state = response.getState(); //fetch the response state
            if (state === "SUCCESS") {
	        alert("Geolocation saved.")
            }
            else {
                alert("Geolocation not saved.");
            }
        });
        //invoke the Apex method
        $A.enqueueAction(action);
        ...
Next, what we’ll want to do is close the Lightning modal window, and refresh the page. This can be achieved using the following:
        ...
        //close quickaction window
        $A.get("e.force:closeQuickAction").fire();
        //reload page to display updated geolocation
        window.location.reload();
    }
})
That’s it! That wasn’t so bad, was it? Let’s test it!
Step six – Add lightning quick action button.
The last step (if you haven’t been intermittently testing as you go) is to create a lightning quick action button and try it out.
Navigate to Setup > Object Manager > Lead > Buttons, Links, and Actions, and select New Action. Set the Action Type to “Lightning Component,” and select our GeolocationCapture component.

Hit save, and then navigate to the Page Layout for the Lead object. Select Mobile & Lightning Actions, and drag “Capture Geolocation” down to the appropriate section. Hit save, and let’s test it out!

We’ll create a test lead via a Global Quick Action:

Navigate to your new lead, and notice that in the dropdown on the righthand side, we have our Capture Geolocation button:

Click on Capture Geolocation, and allow location services:

Once geolocation is allowed, the latitude and longitude will pop up on the modal popup. Hit Capture Geolocation to save to the record.
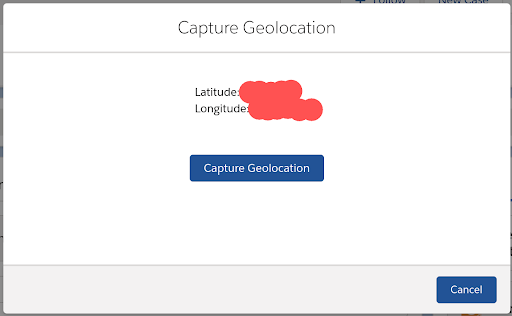
This may take up to a minute as the action is enqueued. Once it is complete, the modal window will close and the page will refresh. Once the page has refreshed, we can go to the Detail for our lead, and the geolocation will be populated!

Thanks for reading, let me know if you have any comments or questions!

Evelyn Maguire
Another Salesforce Blog

Make a one-time donation
Make a monthly donation
Make a yearly donation
Choose an amount
Or enter a custom amount
Help keep Another Salesforce Blog on the internet by donating today!
Your contribution is appreciated.
Your contribution is appreciated.
DonateDonate monthlyDonate yearly
One response to “Capturing Geolocation Using Lightning Components”
[…] I’ll be expanding on my previous post, Capturing Geolocation Using Lightning Components. If you don’t need to capture your device’s geolocation for a lead, that’s okay! […]